Your first trajectory
Goal of this article: get one shot from an empty window to a firing solution, and know which of the six tabs owns which decision. It is the map; each step has (or will have) its own article for the detail.
Everything starts with Trajectory → New. One dialog — Shot Parameters — describes the whole
shot across six tabs, and OK computes it. There is no separate “calculate” step and nothing is
computed while you type.
First, imperial or metric
Trajectory → New does not open the dialog straight away; it asks for a measurement system first:
Trajectory → New → Imperial (Ctrl+I) |
grains, feet per second, inches, yards, inHg, °F |
Trajectory → New → Metric (Ctrl+M) |
grams, metres per second, millimetres, metres, hPa, °C |
Three things are worth knowing about that choice, because it is less binding than it looks:
- It belongs to the window, not to the application. Several trajectory windows can be open in different systems at once, and each keeps its own.
- It is not permanent.
View → Measurement System(Ctrl+Shift+I/Ctrl+Shift+M) restates the active window in the other system, converting the values rather than relabelling them. You will not lose a load by starting it in the wrong system. - Angular units are a separate choice.
View → Angular Units— MOA, mils, thousandths, milliradians, in/100 yd, cm/100 m — does not follow imperial versus metric, because a metric shooter with an MOA scope is perfectly normal. Your scope’s click size is a separate matter again, entered on the Rifle tab in whatever unit the turret is marked in.
Two smaller consequences, in case you meet them: the standalone tools under Tools (both drag-table
builders, the BC converter, the sight and barrel dictionaries) belong to no window, so they open in the
system of the last trajectory you created — remembered between sessions, imperial until you create
your first. And opening a saved .trajectory file restores the system that file was saved in,
without changing that preference.
The six tabs, in the order the work happens
Only the first tab has to be filled in. The rest have defaults, and the dialog will offer them. Each tab has its own article; the ones not linked below are still to be written — see all articles.
1. Ammunition — the projectile (required)
Weight, ballistic coefficient and muzzle velocity are the three numbers without which nothing can be computed. This is also where a measured drag curve is attached, where the bullet’s diameter and length are entered when the correction terms need them, and where a load is saved for re-use so you never type it twice.
📖 The Ammunition tab — filling it by hand and saving the load, loading one
from the library, driving the shot from a .drg curve, and exactly when diameter and length are
needed.
2. Weather — the air (defaults to ICAO standard)
Altitude, pressure, temperature and humidity, with a Reset to Standard button. Left empty, the shot runs in the standard atmosphere. Two things here cause more wrong answers than anything else in the dialog — whether your pressure reading is station or sea-level, and the fact that altitude and pressure are not two ways of saying the same thing.
📖 The Weather tab — the four fields, why the pressure must be the one where you are standing, and what the standard atmosphere gives you.
3. Wind — the air, moving (defaults to none)
One or more wind zones along the flight path, each with a direction, a speed and the distance at which it starts — a wind entered from 250 m means the first 250 m are calm. Left empty, the shot is computed in still air. Wind direction is a convention worth getting right before trusting a windage number, and the first zone does more than the others — crosswind aerodynamic jump is imparted at the muzzle and reads only that zone.
📖 The Wind tab — the direction convention against the dial, what a zone’s distance means, and when zones are worth the trouble.
4. Rifle — the sight and the barrel (defaults to a 3 in sight height)
The sight’s height above the bore and its click values, and the barrel’s rifling — twist direction and twist rate. Sight height matters at every range; the rifling is what makes spin drift and aerodynamic jump computable at all. Leave the barrel out and both terms are silently absent from the answer.
📖 The Rifle tab — sight height and what it does to the trajectory’s shape, presets, click values, and the three inputs spin drift needs.
5. Zero — where the rifle is sighted in (defaults to 100 yd / 100 m)
The zero distance, the angle the rifle was zeroed at, and an optional impact offset if the rifle does not print dead centre at that distance. The application never asks you for a sight angle: it computes the zero from these inputs. This tab also holds the feature few free solvers have — zeroing with a different cartridge, atmosphere or wind than the shot itself, so you can zero supersonic and shoot subsonic.
📖 The Zero tab — the ordinary one-number zero, what “leave it alone” actually assumes, and the four ways a zeroing afternoon can differ from the shot.
6. Parameters — how far, how fine, and the exotic corrections (defaults to 1000 yd/m in 100 yd/m steps)
Maximum range and output step, this shot’s angle, any clicks already dialled on the turrets, and the Coriolis group — barrel azimuth and your latitude. Coriolis is noise at ordinary distances and is not at very long ones; leave azimuth and latitude out and the term is absent.
📖 The Parameters tab — what a fine step really costs, why a table can end early, dialled clicks, and measured Coriolis figures.
Pressing OK
The dialog checks three things, in this order:
- Ammunition must be complete. Missing weight, BC or muzzle velocity gives “Ammunition data is required.” — nothing else is checked until it is filled in.
- A half-filled tab is an error. If you have entered part of the Weather, Rifle, Zero or Parameters tab, the dialog names the tab: “Not all required data filled in: …”. It will not guess the rest.
- An untouched tab is offered a default. Tabs left completely empty are listed with “… not filled. Use default values?” — answer yes and the defaults noted against each tab above are used.
So the shortest possible first run is: fill in the Ammunition tab, press OK, accept the defaults. That gives a real trajectory for a standard-atmosphere, still-air, 100 yd zero shot out to 1,000 — enough to see the machinery work before you start refining inputs.
Reading the answer
OK opens one window, titled with the ammunition name, holding four views of the same shot:
| View | Shortcut | |
|---|---|---|
| Table | the numbers, row per step: range, velocity, Mach, drop, hold, clicks, windage, time of flight, energy, optimal game weight | Ctrl+T |
| Chart | one variable against range — velocity, Mach, drop, windage or energy | Ctrl+C |
| Reticle | the sight picture through your reticle, with BDC and target overlays | Ctrl+R |
| Summary | point-blank range and dead zone, near and far zero, and where the bullet goes subsonic |
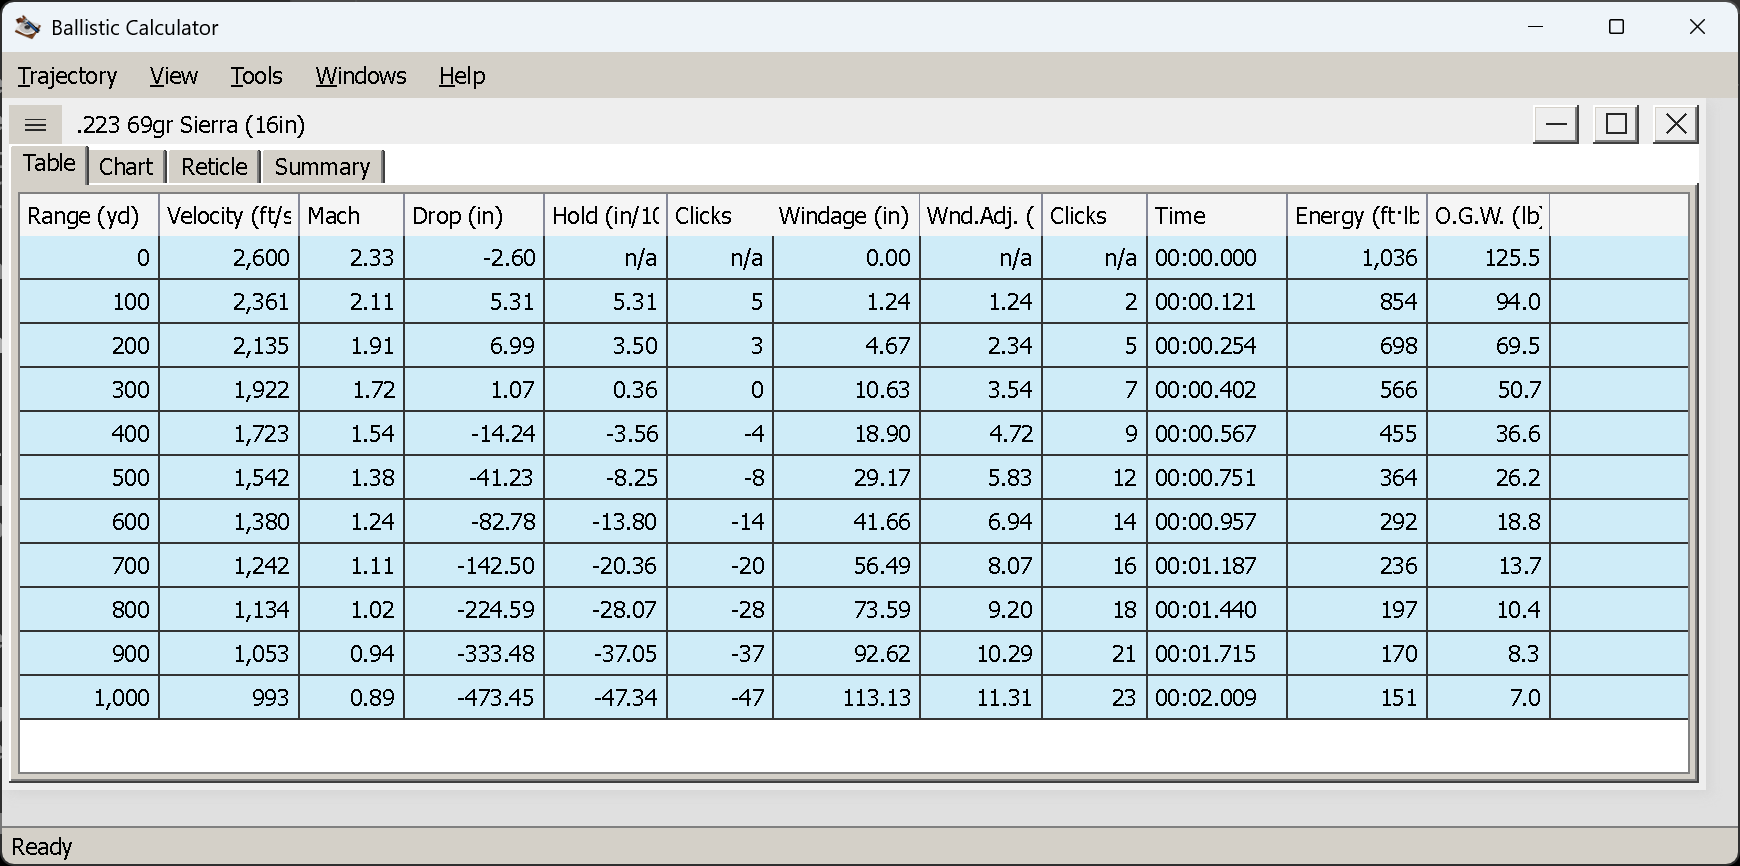
📖 Reading the table · The chart view · The reticle view — the summary view’s article is still to be written.
Changing your mind
View → Edit Parameters (Ctrl+E) reopens the dialog for the active window with everything as you
left it, and recomputes on OK. Iterating on one shot is the normal way to work — you do not need a new
window to try a different zero or a stiffer wind.
When the answer is worth keeping, Trajectory → Save writes a .trajectory file holding the whole
shot (and the window’s measurement and angular units); Trajectory → Export As CSV writes the table
itself, in either a local Excel-friendly format or a portable invariant one. To put two loads side by
side, open both and use View → Compare → Add.
Next
The Ammunition tab — the projectile, and the only tab you cannot skip.